A Guide to the Steps in Radon Mitigation Services
Radon is an invisible, odorless, and radioactive gas that can accumulate in residential and commercial buildings, posing a serious health risk. Since it is naturally occurring and undetectable to the senses, professional testing is the only way to know whether your property has elevated levels of this gas. The following guide outlines the steps professionals use in radon mitigation services for homes and businesses.
Initial Radon Testing
Testing is the first step to determine the concentration of radon gas. Professionals use calibrated devices and laboratory-activated charcoal kits to measure radon levels, which are reported in picocuries per liter of air (pCi/L). If the results show a level of 4.0 pCi/L or higher, the Environmental Protection Agency (EPA) recommends taking action to reduce your exposure.
Radon exposure is a leading cause of lung cancer, second only to smoking. Prolonged exposure to high radon levels can damage lung tissue, increasing the likelihood of developing respiratory illnesses over time. Addressing radon promptly is essential to protect the health and well-being of everyone in the affected space.
Depending on your needs, a certified specialist will determine the best testing method for quick results to have a base radon level to work from After analyzing the results, the mitigation team can formulate a precise plan tailored to your property’s structure and radon levels.
Identifying Radon Entry Points
After confirming elevated radon levels, the next step is to identify how the gas is entering the building. Radon typically seeps through the ground into a structure through cracks in the foundation, gaps around service pipes, or exposed soil in a crawl space.
In commercial properties, entry points may include large utility chases, elevator shafts, or unfinished storage areas. A detailed inspection allows the mitigation professional to pinpoint specific vulnerabilities. Commercial properties face unique challenges in radon mitigation, including larger spaces, complex layouts, and higher occupancy rates. Certified professionals tailor solutions to meet these demands.
Selecting the Right Mitigation System
After identifying the gas entry points, the next step in radon mitigation services is identifying the right system for your needs. The most common and reliable method of radon home mitigation is an active soil depressurization (ASD) system, which uses a fan to draw radon gas from beneath the foundation and vent it safely outdoors.
The specific type of ASD system depends on the building’s foundation type, such as a basement, slab-on-grade, or crawl space. For example, a home with a basement may require a sub-slab depressurization system, which involves drilling a hole through the concrete slab. In commercial settings, specialists may recommend multiple ASD systems or tailor solutions to match larger square footage, complex layouts, or varied occupancy. A certified professional will explain the options and help you select the best approach for long-term radon reduction.

Sealing Cracks and Gaps
Professionals use high-quality sealants and materials to close cracks in the foundation, walls, and floors. Additionally, they seal gaps around pipes, wires, and other utility penetrations that could allow radon to enter.
While sealing alone is not a standalone solution for high radon levels, it complements the primary mitigation system. It effectively reduces radon seepage into the home, thereby improving the system’s efficiency.
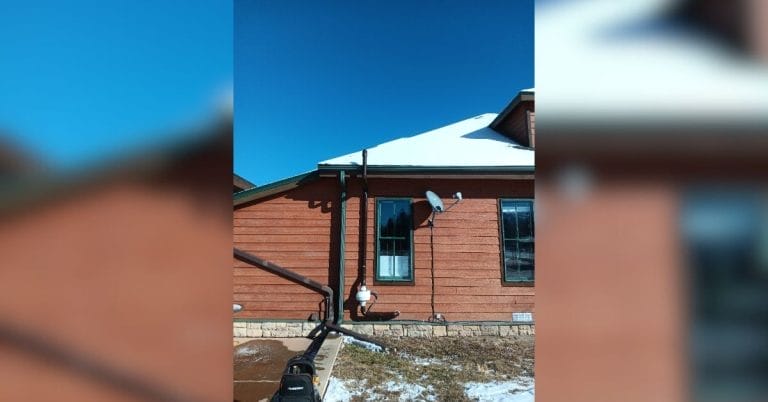
Installing the Mitigation System
After finalizing the plan, the installation process begins. For a sub-slab depressurization system, technicians will create a suction point by drilling a small hole in the foundation. Then, they will connect PVC piping from this point to a specialized radon fan, which runs continuously to pull radon gas from beneath the home.
The piping is routed to the exterior of the house, where it vents the gas above the roofline. The fan is typically installed in an attic, garage, or outside to minimize noise. Professional installation ensures the system operates effectively and discreetly.
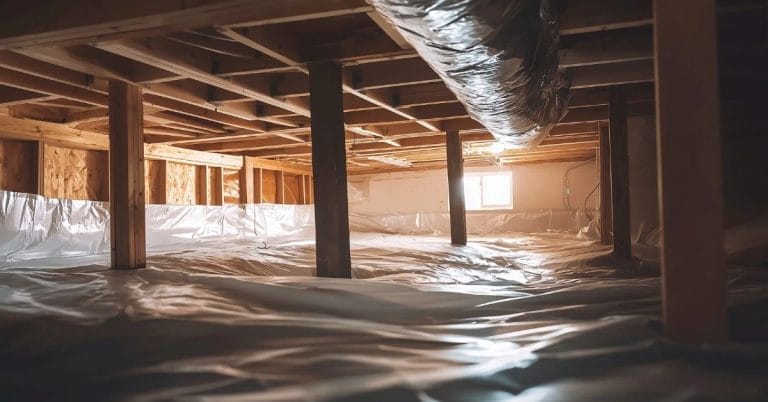
Understanding Vapor Barriers
A vapor barrier is essential for radon mitigation in homes with crawl spaces. The barrier is a thick plastic liner that covers the exposed earth in the crawl space, creating a seal to block radon gas from rising into the home. This membrane is sealed to the foundation walls and around support piers to create an airtight barrier. When combined with a sub-membrane depressurization system, the vapor barrier helps collect the radon gas so it can be effectively vented outside.

Post-Mitigation Testing
After the radon mitigation system is installed and operational, technicians conduct a follow-up test to verify its effectiveness. This short-term test confirms that radon levels have been successfully reduced to below the EPA action level of 4.0 pCi/L.
Here are some key elements included with a professionally installed mitigation system:
- A system label with the installer’s information and installation date.
- A post-mitigation radon test to confirm radon reduction.
- A warning device, known as a manometer, to visually indicate system operation.
- A review of how the system operates and how to maintain it.
- Compliance with all state and local building codes.
System Monitoring and Maintenance
A properly installed radon mitigation system requires minimal maintenance, but it is important to monitor its performance. The system includes a manometer, a U-tube pressure gauge that indicates whether the fan is creating a vacuum. You should check this gauge periodically to confirm that the system is running correctly.
Additionally, the radon fan should be inspected every few years to ensure it is in good working order. While the fans are durable, they will eventually need to be replaced. Performing checks and retesting every two years will maintain a safe and healthy indoor environment for years to come.
Radon mitigation is a systematic process that effectively reduces the health risks associated with radon exposure in your home or business. From initial testing and diagnostics to system installation and post-mitigation verification, each step provides a reliable, long-term solution. By sealing entry points and installing a custom ventilation system, professionals create a safer living environment.
If you have concerns about radon gas, don’t delay; consult with a certified mitigation specialist at Affordable Radon Southwest to protect your health.